Everything the app does, in roughly the order you will need it: from your first SSH host to controlling the fourth display of a Mac you left at home. Written for SharkTTY on iPhone and iPad, and for the free SharkTTY Desk companion on the Mac.
No account is needed to reach your own servers. Every feature described here is free.
SharkTTY opens a shell on anything that runs a standard sshd — a VPS, a NAS, a Raspberry Pi, a workstation. Plain SSH needs nothing installed on the other end. Mosh and ET each need their own small server package, and both are optional.
Open Settings, go to the Hosts tab and tap + at the top right. A new host has four things you have to fill in and several you can ignore at first.
Password has two modes. Save password keeps it in this device's iOS Keychain; with sync on it follows you through iCloud Keychain, end to end, never through our server. Enter on connect stores nothing and asks each time. If your server sends its own prompts — a one-time code, a hardware token — choose Keyboard-interactive / 2FA instead: you answer the prompts at connect time and nothing is kept.
Save the host and tap it to connect. In the host list a single tap selects, a double tap connects straight away.
Already have a config file
Settings → Hosts → Import from SSH config takes a pasted ~/.ssh/config or a file you pick. It imports host aliases, addresses, usernames and ports only — never passwords or private keys. Entries using ProxyCommand are skipped, and an entry with ProxyJump is imported as a direct connection until you point it at a jump host by hand.
Keys live in the Account tab of Settings. Tap + and pick one of three routes: Generate key, Add by pasting text, or Import from file.
Private keys stay in the iOS Keychain. Turn Sync via iCloud on for a key and it travels through iCloud Keychain to your other devices — the same end-to-end channel Apple uses for passwords, not our servers. If you sign in to a SharkTTY cloud account, your hosts, scripts, drive mappings and templates sync, and passwords, private keys and passphrases explicitly do not.
Back in the host editor, Authentication → Method → Key lets you pick the key for that host. If the list is empty the editor says so and sends you to the Account tab first.
The first time you reach a server, SharkTTY fetches its host key and shows the SHA256 fingerprint with a Trust & connect button. Compare it against the fingerprint your server administrator published, or against what ssh-keygen -lf prints on the server itself. Once you accept it, it is recorded.
If that key ever changes, the connection stops with a warning instead of continuing. The honest reading is: the server was reinstalled or had its key rotated, or someone is sitting between you and it. Only use Trust new key & reconnect when you know which of those it is.
To deliberately re-pin a server — after a rebuild you performed yourself — open the host and use Clear recorded host key. The next connection asks you to confirm the new fingerprint from scratch.
All three give you an interactive shell. They differ in what the server needs and in what happens when the network moves under you.
| Transport | Needs on the server | Survives a network change | Worth knowing |
|---|---|---|---|
| SSH (direct) | Nothing beyond sshd | No | Works with any host you can already ssh into. |
| Mosh (accelerated) | mosh-server | Yes, over UDP | Roams across Wi-Fi and cellular and echoes your typing locally when latency spikes. |
| ET (experimental) | etserver, port 2022 by default | Yes, over TCP | For networks that block UDP outright. Off by default; turn it on in Settings first. |
Mosh predicts what you type so the screen responds before the server answers. Settings → Terminal → Default prediction mode offers Adaptive, which turns prediction on only when the link is slow, plus Always and Never. Adaptive is the default and is right for almost everyone.
ET is still being tested and is off until you enable the ET (Eternal Terminal) transport in Settings. Once on, it appears as a third connection method in the host editor. One thing to plan around: like Mosh's UDP, an ET data connection goes straight from the device to the etserver port and is not forwarded through a jump host.
iOS suspends apps shortly after they leave the screen, so no mobile terminal can hold a TCP connection open forever. SharkTTY handles that in two layers.
The most dependable answer, on any transport, is a multiplexer on the server. Attach a connect script such as tmux new -A -s mobile and every reconnect reattaches the same session instead of starting a new shell. Scripts are covered next.
One more small thing that saves a lot of waiting: turn on Bell system notifications in Settings. When a terminal rings its bell and that session is not the one you are watching, iOS posts a notification. Append printf '\a' to a long-running command and your phone tells you when it finishes.
A script in SharkTTY is a block of shell text that runs in the terminal right after the connection opens. Settings → Scripts, tap +, and either start from a blank script or pick New from template.
The template picker is grouped by what people actually reconnect for:
Set a host's Platform and the picker narrows itself to templates that fit that machine, so you are not offered apt on an Alpine box. Edit anything a template generates, and use Save as template to keep your own version for next time.
Attach a script to a host in the host editor and it runs on every connection. Or leave the host clean and choose at connect time: in the host list, Connect with script and Connect directly are separate actions, and a double tap on a script connects with it.
Above the system keyboard sits an accessory bar with the keys a terminal needs and iOS does not have: Esc, Ctrl, Tab and the arrows, plus buttons for uploading a file, showing or hiding the keyboard, and switching on the pointing device.
Settings → Keyboard → Input board switches between the system keyboard and Float, SharkTTY's own on-screen keyboard. The floating board is a full keyboard rather than a strip: symbols, Tab, Return, ⌃⌥⌘ modifiers, an fn key and the F row, laid out like a real keyboard with a two-row L-shaped Return. Drag it anywhere, resize it, and use the opacity slider in its settings popover to fade it back over the terminal — all the way to fully opaque if you would rather not see through it at all.
Layout under the same settings covers US English, UK English, Japanese (JIS), French (AZERTY), German (QWERTZ) and Spanish. A candidate strip above the keys suggests likely words and common commands as you type. The mic button in the top bar has two behaviours: tap it to switch to the voice board, or hold it to push to talk straight into the candidate strip.
Mouse reporting decides who gets your trackpad. On, clicks and drags from a connected trackpad or mouse are sent to programs that understand them — vim, tmux, htop, less. Off, the pointer selects text instead. It only makes a difference while a program has actually asked for mouse support. On iPad, external keyboards and trackpads work throughout.
Hold the mic to talk. Recognition runs on the device: free, offline, and instant, with nothing sent anywhere. What it heard lands in the voice board as editable text, and Insert types it into the terminal.
Recordings are kept as segments, so you can trim one and re-recognize just that part instead of saying the whole thing again. History keeps past recordings for playback and another pass. On iPad the voice board floats and zooms like the transparent keyboard.
AI is optional and separate from recognition. Add a provider under Settings with your own key — the OpenAI, Claude, Gemini, Kimi and GLM API formats are supported — and set a chat model, plus a transcription model if that provider has one. Claude is chat-only and has no audio API, so recordings there fall back to on-device recognition. Provider keys stay in this device's Keychain and never sync.
With a provider connected, prompt modes rewrite what you said into clean text or a ready-to-run command, and Attach terminal context lets the model see what is on screen before it answers. The chat panel puts a conversation next to the session so you can ask a question without leaving it.
If you would rather not bring a key, official cloud models are available once you sign in to a SharkTTY account. They are paid for with Points, bought through in-app purchase and shared across your devices. On-device recognition stays free either way.
There are two ways to get a file onto a server, and they suit different moments.
The Files tab in Settings maps storage you can reach from the device as drives: iCloud Drive, a shared folder, an app-local folder, or a WebDAV server by URL. Once mapped, a drive is browsable in the same file manager, which is how a file gets from a NAS to a server without a laptop in between.
Connections open as tabs you can rename. Tile all connections shows them together; Split left/right and Split top/bottom put two side by side; Focus this connection brings one back to full size. On iPad this is the difference between watching a deploy and watching a log while a deploy runs.
Remote desktops live in the same workspace as terminals, so a Mac session and three shells can share the grid.
Set Jump host (ProxyJump) in the host editor to connect to the bastion first and reach the real host through it. The jump host authenticates with its own saved key or password, non-interactively; a bastion that requires keyboard-interactive login is not supported yet.
Only the SSH connection travels through the jump host. Mosh's UDP and ET's data connection go directly from the device to the target, which is worth checking before you rely on either from outside the network.
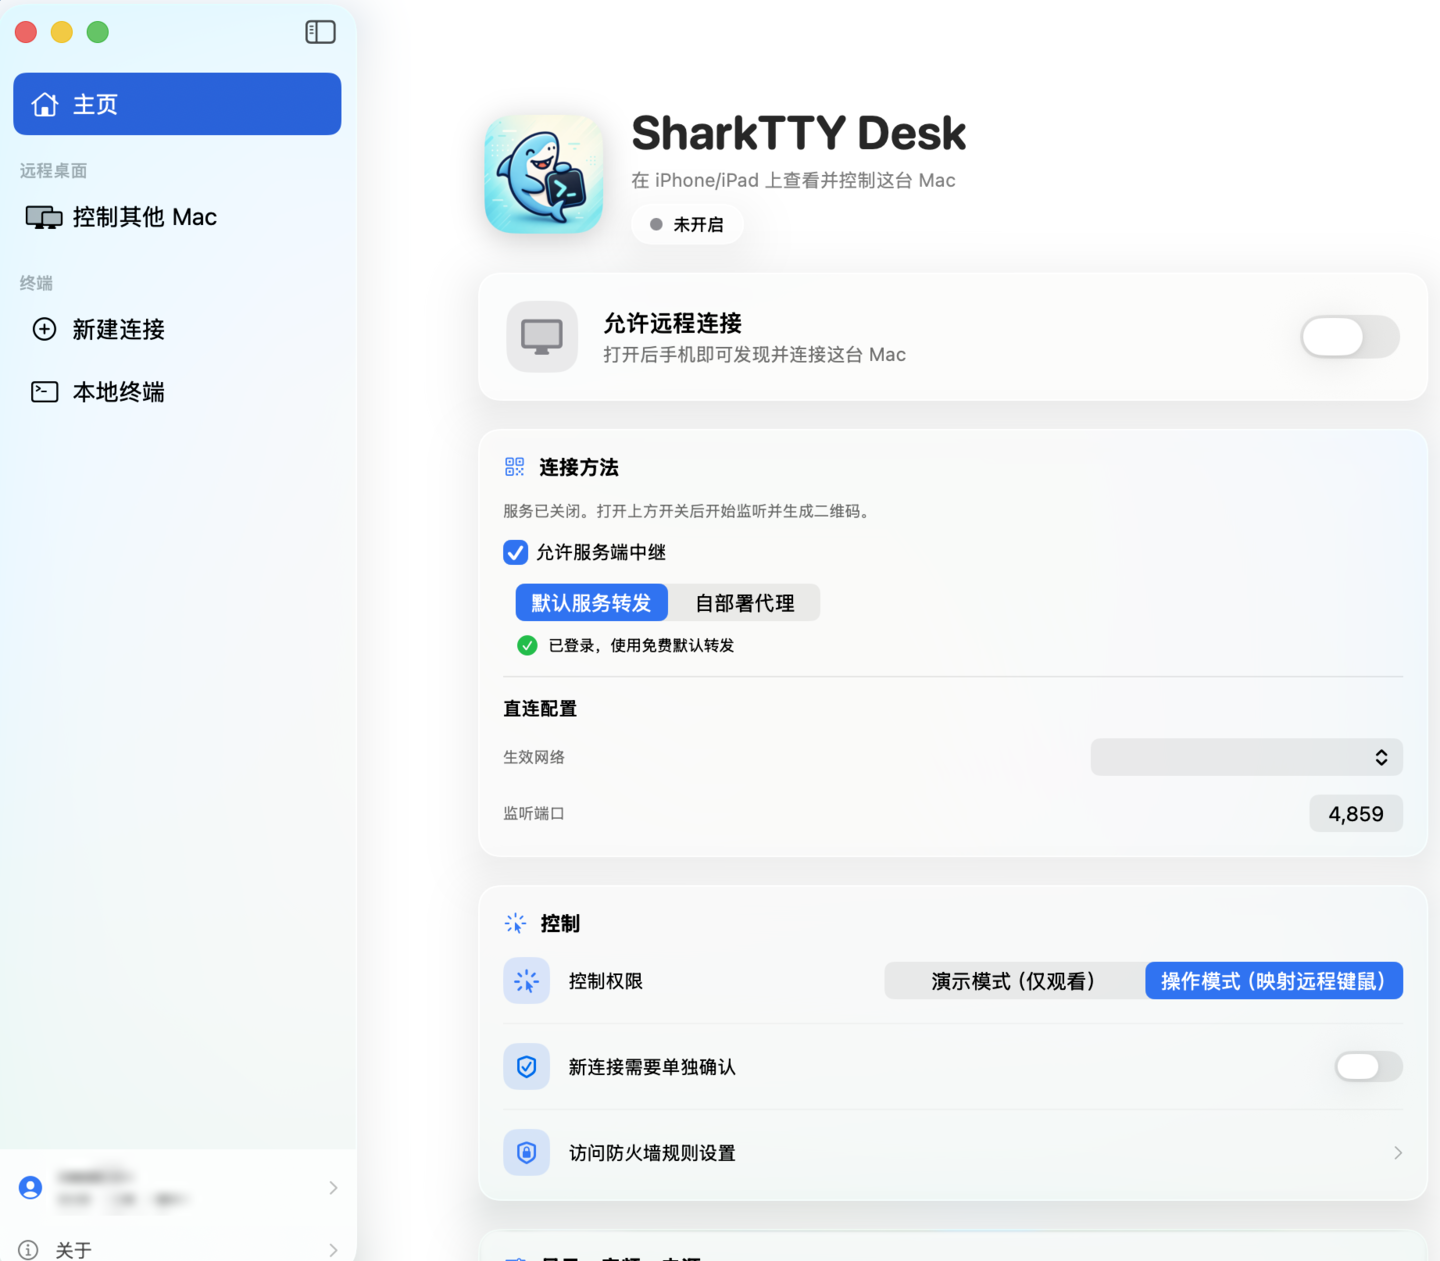
The second half of SharkTTY is a full remote desktop for a Mac. It needs one free companion app on the Mac — SharkTTY Desk — and no port forwarding, no VPN and no router configuration at all.
SharkTTY Desk is free and runs on macOS 14 Sonoma or later on an Apple Silicon Mac (M1 or newer). Download the disk image from the Mac app page, drag SharkTTY Desk into Applications and open it. It has no Dock icon; it sits in the menu bar with a window you can open from there.
Two permissions are needed on first run, and the app's panel links straight to the right pane of System Settings → Privacy & Security:
Check versions before you start. SharkTTY Desk 0.9.0 needs SharkTTY 1.6 or later on the iPhone or iPad, and two-way audio needs 1.7 or later. If you cannot update the app yet, the older SharkTTY Desk 0.5.0 build still works with pre-1.6 apps.
In SharkTTY on the iPhone or iPad, tap + and choose Add remote desktop. There are three ways to fill it in:
Give the desktop a name you will recognise, then Save & Connect. If the Mac is set to ask before letting anyone in, the app waits while the person at the Mac taps Allow.
Someone can also share a Mac with you by link. Shared desks appear under Shared with Me once you are signed in. A share can be view-only, can expire, can be revoked at any time, can cap how many people connect at once, and can be limited to particular accounts.
A Mac with several monitors sends all of them. Arrange screens sets the layout — Side by side, Stacked, Quad, or Picture-in-picture — and you can reorder the displays so they match how they sit on your desk. Each display streams on demand, which is what keeps a three-monitor Mac usable on a phone.
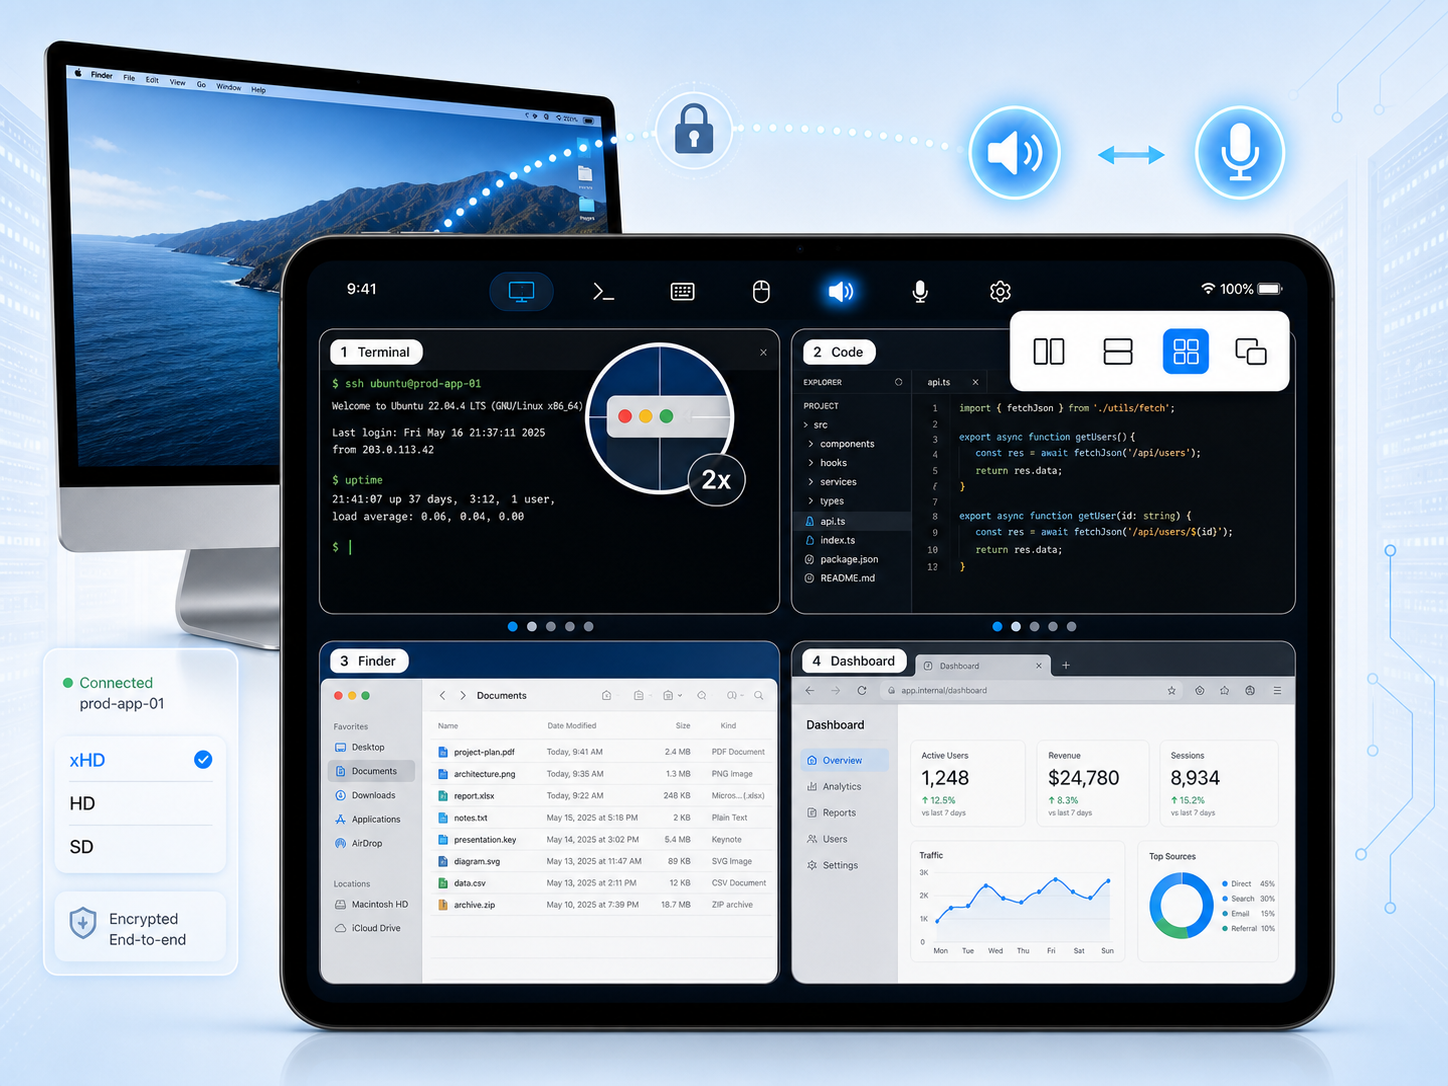
Tap a screen to take control of it; switching displays re-points typing and pointer input at the new one. Focus enlarges a single display when you want the detail. In adjust mode you can drag the picture to reposition it and pinch to zoom.
Direct touch is the quickest way in: one finger glides the pointer without clicking, and a second finger clicks where it is. A two-finger tap is a right click.
For precise work there is a virtual mouse with left, middle and right buttons: press and hold to lock a drag, and there is a wheel gesture for scrolling. The buttons can be docked into a single panel along the bottom of the screen that slides left or right to wherever your hand rests, and rides up above the on-screen keyboard when one is open.
The magnifier shows the area under your fingertip at native resolution, which is how you hit a checkbox in a preferences window from a phone. With the mouse buttons docked it sits directly above the cursor instead of drifting toward a screen edge. ⌘, ⌥ and ⌃ behave as one-shot modifiers: tap one, then tap the key it applies to.
One keyboard button with a mode dropdown switches between SharkTTY's floating keyboard and the system keyboard with a shortcut toolbar. The floating board carries the modifiers and F-keys that macOS expects and iOS does not offer.
A quick-actions menu sends the shortcuts that are awkward to type: Spotlight search, Mission Control, App windows and Switch app; Tile left, Tile right, Fill, Center, Minimize and Hide app; Close window, Quit app and Force Quit; area and full-screen screenshots; and Lock screen. The clipboard syncs both ways, so you can copy on the Mac and paste on the phone.
The video is hardware-encoded H.264 captured with ScreenCaptureKit, and the client picks the tier: xHD renders the Mac's native pixels, HD and Standard trade sharpness for bandwidth, and Smooth favours frame rate over everything else.
Leave Auto-reduce on weak link on and the session steps down on its own when the network dips, then holds there rather than stuttering. On the same Wi-Fi as the Mac, xHD is usually fine.
Remote audio brings the Mac's system sound to the device, so a video or a call on the Mac is audible in your hand. Microphone input goes the other way and turns the iPhone or iPad into the Mac's microphone, which covers calls, recordings and dictation made on the Mac while you are not at it.
Both directions need SharkTTY 1.7 or later on the device. The audio itself is carried as Opus.
Virtual display, still in beta, creates an extra headless screen sized to your iPad. It is the answer for a Mac mini with no monitor, and for carrying a second workspace around.
Desk can wake a sleeping Mac over the network and keep it awake while you are connected. It can also, if you allow it, show the macOS login window so you can type your password and unlock the machine remotely after a reboot.
Both ends dial out, so there is never a port to open on a router. What differs is the path they meet on.
Sessions are end-to-end encrypted and a relay only ever forwards ciphertext. On a local network several iPhones and iPads can view and control the same Mac at once; the Mac can require approval for each new viewer and can kick any of them off with a tap.
If you would rather not touch anyone else's servers, the relay is open source. Run desk-relay on any public box: it listens for QUIC on the address you pass to --bind and serves the WebSocket fallback on --wss-bind, and link creation is protected by a shared secret you choose. Point SharkTTY Desk at that address, scan the relay link it then shows, and you are the only party the traffic passes through. No SharkTTY account is involved.
Either mosh is not installed on the server, or it is not on the PATH that a non-interactive SSH login gets. Install mosh, or set that host's absolute mosh-server path in Settings → Hosts — /usr/bin/mosh-server on most Linux boxes, /opt/homebrew/bin/mosh-server on an Apple Silicon Mac.
etterminal is missing on the remote, or is not on the PATH for a non-interactive SSH session. Install Eternal Terminal there (apt install et, brew install et), confirm etserver is running and its port — 2022 unless you changed it — is not blocked by a firewall, then retry. SSH and Mosh keep working meanwhile.
That is the check doing its job. A legitimate cause is a rebuilt server or a rotated key; the illegitimate one is somebody in the middle. Find out which before you tap Trust new key & reconnect, and if you rebuilt the machine yourself, Clear recorded host key in the host editor and confirm the new fingerprint deliberately.
Two limits apply. Files are capped at 64 MB, and the host needs a credential the app can reuse — a server whose only login is a one-time code cannot be used for uploads. Use the SFTP file manager, or a mapped drive, for anything larger or fussier.
Check that SharkTTY Desk is actually running on it and not merely installed. If the Mac may be asleep, enable waking it over the network in Desk. Across networks, a connection can take a few seconds while the app tries a direct path before falling back to a relay.
A black picture almost always means Screen Recording was not granted; an unresponsive picture means Accessibility was not, or Allow control is off. Both live in System Settings → Privacy & Security on the Mac, and Desk links straight to them.
Check versions: SharkTTY Desk 0.9.0 needs SharkTTY 1.6 or later on the phone or tablet. Update from the App Store, or install the older SharkTTY Desk 0.5.0 build, which works with earlier app versions.
Nothing you need. The app, the Mac companion, on-device voice recognition and every feature above are free, and connecting to your own servers does not require an account. Official cloud AI models are paid for with Points; using your own provider key costs nothing. Tips are optional, one-time or monthly, and unlock no features — a monthly tip renews until you cancel it in your Apple Account settings.
SharkTTY is free on the App Store, and SharkTTY Desk for Mac is a free download.
More detail on the Mac side lives on the SharkTTY Desk page and questions are answered fastest on the feedback board.